HOW
TO BUFF AND POLISH
MOTOR OIL 101
OIL
ADDITIVES & ENGINE TREATMENTS
BRAKE FLUID 101
STOPPING COOLING SYSTEM
CORROSION
POPULAR MECHANICS
CAR CARE
CAR
CRAFT TECH ARTICLES
CAR CRAFT
HOW-TO ARTICLES
ADVANCE
AUTO PARTS HOW-TO ARTICLES
11. (07/15/09)
Here is something you gearheads should appreciate:
Machinist's Workshop magazine tested penetrants for
break out torque on rusted nuts. They arranged a
subjective test of all the popular penetrants with
the control being the torque required to remove the
nut from a "scientifically rusted" environment. The
results are as follows;
Penetrating oil..... Average load
None ..................516 pounds
WD-40 ................238 pounds
PB Blaster ............214 pounds
Liquid Wrench ..... 127 pounds
Kano Kroil ............106 pounds
ATF-Acetone mix....53 pounds
The ATF-Acetone mix was a "home brew" mix of 50-50
automatic transmission fluid and acetone.
10. (03/06/01)
Prevent rust by keeping the underside of your car
clean. Place a lawn sprinkler under your car and
turn it on full blast. Move occasionally so it will
reach all areas. This is a good way to remove all
salt and road grime.
9. (03/06/01)
To avoid streaks, use newspaper to wipe windows dry
after cleaning.
8. (03/06/01)
A new blackboard eraser is great for quickly
removing the fog from inside car windows.
7. (03/06/01)
When tuning up your car, set gap on plugs using the
widest gap that the manufacturer recommends, Your
car will run better, idle better, and will give you
better gas mileage.
6. (03/06/01)
Clean hard to reach areas (dash, cup holders) with a
dampened sponge-tipped paintbrush.
5. (03/06/01)
Avoid putting air in your tire if the temperature is
below 10 degrees. The valve could stick and let out
all of the air.
4. (03/06/01)
To keep a radio antenna from sticking, occasionally
rub wax paper up and down the antenna.
3. (03/06/01)
Keep a few Handy Wipes In the glove box to remove
gas odor from your hands after filling the tank.
2. (03/06/01)
If your engine or transmission leaks, you can make a
drip pan by placing corrugated cardboard or kitty
litter in a cookie sheet.
1. (03/06/01)
Oil drips on your garage floor can be absorbed with
kitty litter or oatmeal.
9. (12/20/05) TRANSMISSION SUPPORT MOD -
If you have ever removed the transmission mounts, you
know what royal pain it can be to get to the bolts and
nuts. Here is a quick and easy modification to the
crossmember that will make this chore a breeze.
First, slot the holes for the studs on
the rubber mounts (about 2.5 times as long as they are
wide) so that it can be passed over the studs when the
mounts are on the box. Second, drill two holes on axis
with the two studs (in the regular position) in the
main part of the crossmember, big enough to get your
1/2" socket through (about 7/8”). These don't need to
be oval, as your extension is narrower than the socket
and you can tilt it over just fine once you've pushed
the socket through. PHOTO
8. (04/15/05) If you can barely see the instruments in
your MGB at night, replace those old, dim bulbs with
some much brighter ones from Radio Shack. The bulbs
are RS #272-1133A, screw-base, 220 mA @ 7.5 V. In the
first photo, I have upgraded all of bulbs except the
tach. In the second photo, the tach lamp has been also
upgraded. PHOTOS
UPDATE: These Radio Shack bulbs
lasted only two months! I have since replaced
them with LED bulbs from autolumination.com
. I
purchased their single LED, inverted lens Super
White E10 screw base lamps for the gauges.
Unfortunately, they are no brighter than the
original stock bulbs. I will try the 4-LED cluster
E10's soon and let you know how they work out.
I also bought the
inverted lens Ba7s lamps for the heater temp and air
damper knobs. They are just fine.
7. (2/12/05)
LIFT-THE-DOT POST REPLACEMENT- The posts for the
Lift-the-Dot snaps on the back of MGB tops can be a
real pain to remove and reinstall. Their location
makes it almost impossible to get a wrench on the
backing nut. When you are ready to reinstall the
posts, replace the hex nuts with wing nuts. A lock
washer or a drop of Locktite will make sure that they
don't back off.
6. (6/19/98)
FUEL GAUGE SENDING UNIT- If your fuel gauge never
reads above empty, the most common cause is that the
sending unit plastic float has cracked and filled with
fuel. Insead of spending $50 for a replacement of the
entire unit, you can get a brass float of the same
dimensions from your local Ford dealer for about $10.
The part number is COAZ-9202-B. Thanks Bill Breithoff.
5. (6/19/98)
HEAT/DEFROST CONTROL CABLE - The original control
cable that operates the damper for directing the air
coming out of the heater has a stranded wire core. The
after-market replacements I have seen have a solid
core, which is much too stiff. A good replacement is
the brake cable from a ten-speed bicycle. Thanks Cort
Musgrave, Jr.
4. (6/19/98)
A-FRAME BUSHINGS - When it is time to replace the
stock bushings, get the V-8 one-piece bushings. To
install them, dip them in DOT 5 (silicone) brake fluid
and give them a couple of good whacks with a hammer;
they slide right in. Thanks Peter Brauen.
3. (6/19/98)
NON-OVERDRIVE TRANSMISSIONS - The output shaft passes
through a tight seal on the rear half of the
transmission case. When you reinstall the rear case,
the gears will be in a bind until you torque up the
drive shaft flange on the output shaft. If you start
checking for proper shifting before the flange is in
place, you will swear you reassembled it incorrectly.
2. (6/19/98)
TURN SIGNAL FLASHER - Tired of your turn signal
slowing to a crawl every time you step on the brakes?
Replace the original Lucas flasher unit with a round
generic flasher. They won't fit in the mounting clip
under the glove box, but are one fifth the price and
perform much better.
1. (6/19/98)
HARD TO TURN SIDE WINDOWS - I've tried greasing the
window crank gears and rails with little relief. Spray
silicone liberally on the felt window runners. You
could also use WD-40, but I find it attracts more
dirt. Thanks Kevin Gambino.
<TOP>
2. (9/18/04) Long time TR6
owners already now this, but me being a beginner
thought I should share a tip for other fellow BMNCO
beginners with a TR6. The timing cover on the TR6 is
held on by bolts and two very important studs. During
my tear down I only had one stud (which turned out to
not even be in the correct position anyway). When I
reassembled it, like I took it apart, after cleaning
all the oil and gunk I started the motor and had a
glycol leak from behind the two bolts on the timing
cover directly below the water pump housing where it
bolts to the cylinder head. Very bad news I thought.
Not leaking from anywhere else. I thought the front
engine plug had failed or had a cracked block. So I
had to remove the radiator, steering rack, fan belt,
fan, fan extension, crank pully, timing chain, cam
gear, and front engine plate (AGAIN!!) only to find no
sign of a blown plug and no crack. After studying the
Moss Motors catalog I found two very curious sealing
"studs" about $0.75 each that should be in those two
positions where I had standard bolts and split
washers. These two threaded holes tapped into the
coolant gallery of the block!
Moral of the story. Yes be diligent in remembering
how you dis-assembled the components...but also be
diligent to review your shop manuals and parts
catalogs as you do not know how "smart" the last guy
was who took it apart! Remember, how it came apart is
not always how it should go back together. Thanks M
Rankin
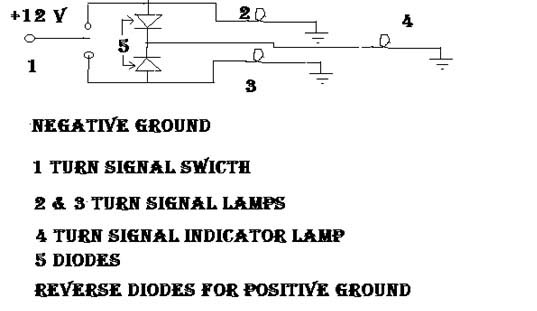
1. (7/13/98) TR4A FLASHER UNIT -
When I started working on my TR4A, I noticed the turn
signal indicator did not work. After further checking,
I discovered the flasher unit installed is a generic
two prong unit; the owners manual calls for a three
prong unit. The attached drawning is a basic schematic
of how I solved the problem without purcashing a three
prong flasher unit. "1" is the center wire for the
turn signal switch, which connects to the output of
the flasher unit under the dash. For the physical
placement of the diodes, I found left and right signal
light wires and indicator lamp wire under the dash,
then made the connection near the steering column. I
used crimp electrical splices for the connections and
then insulated each connection with electrical tape.
Thanks Dave Dupre.
<TOP>
